VPT 8 documentation

VPT 8 by HC Gilje, released may 2018.
Video Projection Tool (VPT) is a free multipurpose realtime projection software tool for Mac and Windows.
This is the online manual.
Download VPT
Problemsolving
Before reporting a problem to the VPT forum have a look in the online manual first, especially read the section on how to launch VPT and open project files.
If this doesn´t help you follow these steps when posting:
1.Which operating system and which version of VPT are you using?
2.Describe what you expected to happen, what you did to get there and what actually happened (or not).
3.Take screenshots (mac: shift+cmd+3, win: Windows + PrtScn)
4. ALWAYS include the contents of the max/message window. You find it either in the windows menu at the top or shift+cmd+m on mac, shift+ctrl+m on windows (see below)


Overview of the documentation
mac: Installing VPT 8, setting up the projector, opening a project
windows: Installing VPT 8, setting up the projector, opening a project
The VPT interface
QUICK START
create a new layer
add a source
adjust the corner points of the layer
store a preset
LAYERS
more about layers
adding more layers
the active layer
creating a mask
Adjusting the size,position and rotation of a source inside a layer
using a mesh
copying and pasting color values
SOURCES
video
still image
mix module
customize the video source modules
solid
live input and recording live input
receiving video from other applications using syphon or spout sources
sending video output from VPT to other applications using syphon or spout
clip control tab
loop points
scrubbing
loop report
playlist
adding sound
triggering multiple clips at the same time
VPT project settings
CONTROLS
more on presets
Cuelist
The router
midi
lfo
OSC
video trigger and soundtrigger
artnet
clock triggers
serial communication
What´s new in VPT 8
VPT 8 has a lot of under-the-hood changes. VPT8 is now built in max 7, it no longer requires Quicktime, and uses the FFmpeg video engine which means it can support virtually any video codec. H264 works really well.
VPT 8 is 64-bit only.
The interface is nearly identical to VPT 7 except for the following:
1. This button has moved from the bottom of the interface. Clicking on the - sign makes the interface slightly smaller, making it fit on screens with a vertical resolution of 768 pixels.
2. The AU button opens the audio settings. Might be useful if you don´t get the LFO controlers to work (the ghost issues related to sound settings has been fixed)
3.New module! Artnet support, making it possible to control VPT over Artnet
4.New module! clock trigger support, trigger presets or cues at specific times of the day
Also the serial module has been improved.

Installing VPT 8 and opening a project - mac
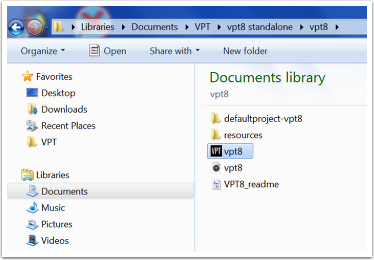
After you have downloaded vpt8 and unzipped it a folder called vpt8 is then created. In this folder you will find the vpt8 application, the default project folder and a few more files.

The first time you try to open vpt by double clicking on it you might get the error below

Instead of double clicking on the VPT app right-click or ctrl-click on the application icon and a menu will appear. Select "Open".

You will get a message similar to the one below. Click "Open" to confirm. VPT should now launch.

If you are planning to connect to a projector you should close VPT and follow the instructions below on how to set up the projector. If not you can skip to the "Opening a project" section just after it.
Opening a project
Due to increased file security the procedure for opening a project is no longer automatic. You have to manually open the project after you have opened VPT.
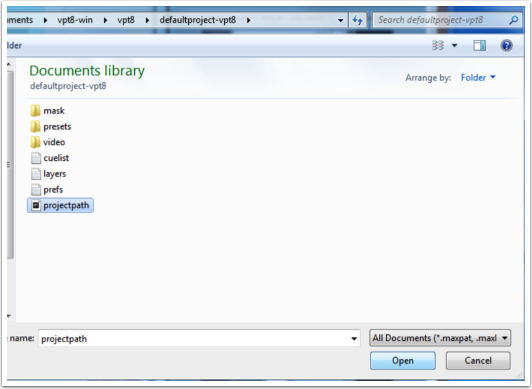
After VPT has launched you need to load the project. Go to File:Open and navigate to the defaultproject-vpt8 folder which is included in the VPT8 download.

select the file called projectpath.maxpat inside the project folder. The project is then loaded and you are ready to get started with VPT!

Setting up the projector - mac
After having connected your projector to the computer you need to make sure the display settings are correctly set up. You should make sure that the displays are not mirrored (showing the same output) as you want the VPT interface on your monitor and the output from VPT on the projector.
Go to system preferences and select "Displays". Make sure Mirror Displays is unselected.

You might also want to select "Show mirroring options in the menu bar when available. Then you can check directly in the menu bar that the projector is used as a separate display as shown in the image below.

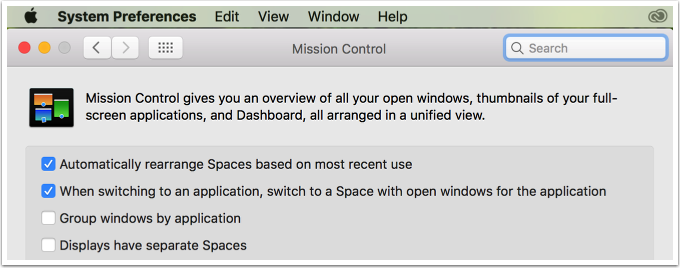
On 10.11 and later you need to go to system preferences: mission control and make sure "Displays have separate Spaces" is unselected. This is to avoid a menu bar in full screen mode.
Installing VPT 8 and opening a project - Windows
When you have downloaded the vpt8-win.zip extract the vpt8 folder preferrably to your user folder, as there are fewer file permission issues when it is placed there.

The vpt8 folder contains several files including the vpt8 exe file and the project folder. The exe file is the one with the black and white VPT icon. Double click on the exe file.
You will probably get a message similar to below. It is recommended to uncheck "Always ask before opening this file", then click Run

Another warning that might come up is a firewall warning. Since VPT doesn´t connect to the internet you could uncheck communication on networks or just leave it on for private networks.

If you are planning to connect to a projector you should close VPT and follow the instructions below on how to set up the projector. If not you can skip to the "Opening a project" section just after it.
Opening a project
Due to increased file security the procedure for opening a project is no longer automatic. You have to manually open the project after you have opened VPT.
After VPT has launched you need to load the project. Go to File:Open and navigate to the defaultproject-vpt8 folder which is included in the VPT8 download.

select the file called projectpath inside the project folder. The project is then loaded and you are ready to get started with VPT!
Setting up the projector - windows
After having connected your projector to the computer you need to make sure the display settings are correctly set up. You should make sure the projector is set to extend the desktop. To do this either go to control panel : display and select "connect to a projector" or use the shortcut windows+p.
Then you get 4 options. You want to select Extend.

The VPT 8 interface
VPT 8 consists of the interface, the preview window and the output window. The output window is the window that should be on your projector output. Click the fullscreen button at the bottom of the VPT interface or hit the [esc] key on your keyboard to go to fullscreen.
Make sure the VPT output window is placed on your projector output (you can just drag it over) before you go full screen or else it will go full screen on your interface display.

interface overview

the VPT control bar

quick start
When you open VPT for the first time, there is probably not much going on, the top left part of the interface will look something like below.
In VPT 8 there is not a fixed number of layers, you add the layers you need for your project.

create a layer
You create a layer by clicking on the + button.

A yellow circle with the number of the layer will appear just below.

In the preview and output window you will see the corner handles of the layer, but since the layer has no source yet it will be black.

In the bottom right section of the VPT interface the layers overview now contains information about the newly created layer

adding a source to the layer
To fill the layer with content you need to first activate one of the sources in the sources section (top right section). Start by clicking on the on button in the first source (labelled 1 v), then click on the area to the right of the on button (where it probably says OFF). A menu of available media is then revealed. Select one of the items. The items in the menu refers to videos in a folder assigned to this particular source. By default this folder is in the default project folder that comes with the VPT download.

To see your selected source click on the monitor button, and a small window next to the source will show you the currently selected media.

To use the activated source in the newly created layer we need to tell the layer which source to use. In the layer section click on none and a menu of available sources will appear. The first 8 sources are labelled 1video, 2video etc. These sources can contain different types of video sources (quicktime, still, hap, mix) but are always referred to by the more generic name of 1video, 2video etc. So in this case we are using source 1video. Select this, and the vpt icon (or another media file you selected) should appear in the preview and output windows.


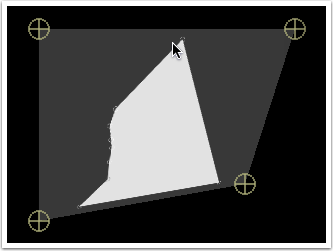
drag the corner handles to position the layer
click and drag on the handles in either the preview or output window to position your layer. If you lose control over a corner (which could happen if you drag a corner across the midpoint of the layer) you can use the undo function ctrl-Z to revert to the previous corner position. Note that the undo function only works inside the preview/output windows.
To move the layer, shift-click and drag on the layer. To scale the layer, alt-clcik and drag on the layer.

storing what we have made
Now that you have created a layer, given it content and postioned it on our output, you want to save our output.
Unlike many programs, File-save is not how you save your work in VPT.
VPT is based on storing presets. Presets store information about the current state of VPT, so basically you save what you see on the output. VPT is a real-time application that renders the output in real-time, so when you save a preset you don´t save an image or video file, but rather information about the current position of layers, which sources are used etc.
To store a preset you need to give it a unique nr and a descriptive (but optional) name, so in this example we have used 1 for the preset number (0 is a special case, don´t use this to store presets) and VPT-layer for the preset name. Click on the store button to save the preset.
If you save another preset with the same number but a different name you will overwrite the old preset. To avoid doing this you can change the behaviour of the store button by clicking on the menu to the right of the button. If you select storenext VPT will save the preset at the next available slot, thus avoiding overwriting exisisting presets. However when you want to modify an existing preset you would probably want to switch back to the normal store mode.

it will now appear in the preset list. You can now close VPT, and next time you open it you can select preset 1 by clicking on it in the preset list.

Adding more layers
Adding more layers is just as simple as adding the first one, just click on the + button.
A few things to note:
A new layer is always added on top of the previous ones, so they will initially obscure the layers underneath before you give the layer a content, position it, adjust the transparency.
If you add layers after you have saved presets with the initial layers, you need to resave these presets with the layers adjusted accordingly (this usually just means setting the transparency of the new layers to 0). This is because the older presets have no information about layers being added later.

Seeing more layers in the layers list
When you start to get a few layers, the layers overview section in the bottom right part might get a bit crowded. You can easily adjust the division between the sources and layers by dragging on the black line to the right of this section

The active layer
The concept of the active layer is important in VPT, as you work on one layer at a time, and it needs to be clear which layer you are working on. This information is located in many places:
The active layer is the layer with the corner handlers in the preview/output window. The yellow circle in the top left section indicates the active layer, and in the layers section the light blue background indicates the active layer.
To navigate between layers (thus changing what is the active layer) you can either click on the circles in the top left section, on the numbers on the left side in the layers section, or use the number keys on your keyboard to switch between the layers (1-9).

the active tab
In the control tabs section in the lower right part of VPT there are a lot of options for controlling parameters for layers, sources and presets. You select a tab by clicking on the name of the tab.
The active tab refers to the active layer, and lets you set and adjust parameters related to the layer:
position and scaling of the layer (predefined sizes from a drop menu), fine adjustment of the corner pins
transparency, color, geometry, mask (with the easy to use mask editor) and edge blend.
numerous ways of adjusting the texture (the content/source of the layer) with brightness/contrast/saturation (brcosa), mesh distortion, scaling, flipping and rotation of the texture as well as blur and motion blur.

A note about adjusting numbers in VPT
If you click on a number it gets a red triangle which means it is the active parameter. You can now use the keyboard to enter a value. To change values using your mouse, you click and drag on the number. Click and drag up to increase the value, down to decrease the value. Where you click on the number determines the precision/resolution of the value: The further behind the decimal point you click the more numbers behind the decimal point.

MASK
Creating mask for a layer
first, make sure you are in the layer you want to apply a mask to. Also, it might be useful to use a white solid as the source for the layer while making the mask to easier see the outlines. The solid should be set to max size to get the best quality mask.
Make sure your layer covers the area you want to mask before you start making the mask.
Click on the editor button to open the mask editor.

The mask editor opens on top of the VPT interface. If this is the first mask you make, you will see a grey triangle with corner handles. This is the default mask which you can return to by clicking the reset button. On your preview/output window you now see the mask form inside your active layer (active layer is indicated by the number in the top right section of the mask editor).

You creat more points in the mask outline by clicking between existing points. Click and drag on a point to move it to the desired location. You can add as many points as needed to make your mask as precise as possible. You can delete a point by selecting it (it is then red) and hit the delete/backspace key on your keyboard.

You will notice that the changes you do in the mask editor is updated in the preview/output windows.
When you are happy with the mask shape, give the mask a name (here newmask), and click the save mask button. The mask editor window will then close.

in the active layer tab you will now see that the mask is active, using the newly created newmask
When you create a mask, it is saved as a black and white png file and saved in the mask folder inside your project folder. You can see (and select) the available masks by clicking on the mask menu.

circular mask
in case you want to make a circular mask instead of a mask based on points, select circle in the mask editor and change the circle diameter by dragging the slider in the top right section. Save the mask as you would do with the point mask.

adding a blur before you save the mask
if you know that you want to have a blurry edge on your mask it is much more efficient to apply the blur before you save it as a file, than to apply the blur afterwards (although this is possible using the maskblur section). Simply click on the blur button and drag the slider to get the blur you want.
The blur is only visible in the preview/output window, not in the editor.

How to use a layer as a mask for underlying layers
First, create a layer, make sure it is the top layer and fills the whole output and use solid as a source. Create a mask using the mask editor and save it as you normally would.


The topmask should function the opposite of a normal mask: the mask shape should be transparent while the surrounding part should be opaque.
To achieve this you need to do 2 things: First, invert the mask, second change the color of the layer to black.

Now you have a cutout mask in the top layer
creating a complex mask
Sometimes you need more complex masks than you can make with the mask editor.
One way of doing this is to combine multiple layers to create a mask, where each layer is either a black or white solid, with or without a mask. Save all the layers as a preset, thus making it easy to adjust the mask later.

To use this as a mask for another layer you need to first go to fullscreen and then take a screenshot of the output.

Rename the screencapture and put the image file in the mask folder

click the circle next to the maskmenu to refresh the menu and you will find your newly created mask.
You can now use this mask as any other mask, just make sure that the layer that uses the mask covers the whole output (or else the mask wouldn´t fit)

Adjusting or making new masks in an image editing application
You can easily adjust existing masks or make new masks in an image editing application like gimp or photoshop, just make sure to put them in the mask folder in your project folder. The mask files are png files 1024x768 pixels.
MORE ACTIVE LAYER ADJUSTMENTS
Adjusting the size and position of a source inside a layer
After you have positioned and scaled your layer you might want to adjust the size, position and rotation of the source inside the layer. When you are doing adjustements to the source inside a layer you are not affecting the original source. When a layer is given a content this is called it´s texture, so we can use the same source for several layers but they will be treated as individual textures for each layers.
Sometimes you only want to use a part of a texture, maybe you want to use different parts of a source on different layers.
In this example there are two layers, the first one covers the left half of the output, the other one the right half.

We want to use only half of the texture on each layer, so we can use the tile option in the active tab. For the left layer we only want to use the first half of the texture in the horisontal direction. The tiles are divided in halfs, thirds, fourths and fifths in both the x and y direction so for instance 2/3 in the x direction would mean we use only the midt hird of the texture.
Here the texture is changed for the first layer

then we do the same thing for the second layer, except this time we want to use the second half of the texture. I have added a blur to this layer to see the difference between the two layers.


the flip section lets you flip the texture horisontally, vertically or both.

Here we have chosen to flip it vertically on both layers.

zooming, panning and rotating the texture
Tiles work fine in some situations, but sometimes you need more control. The zoom control lets you zoom into the texture, move it around and even rotate it, inside the layer border.

This can be very useful when you want to fit the texture inside a mask.

the mesh editor
VPT 7 has an easy to use mesh editor, available in the active tab. Click on the mesh button to open the mesh editor, and you will see an interface not too different from the mask editor. It is important to first either reset the mesh or select the gridsize. In this example it is set to 3x3, so a total of 9 control points. If you want to see the grid on the output click on "show ctrl matrix".
Simply drag the control points to distort your image.


Close the mesh editor to save the mesh grid. The mesh settings will be saved with the layer when a preset is stored.
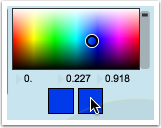
Copying and pasting color values
Sometimes you might want to use the same color in different layers. It´s easy to copy colors in the active tab.


SOURCES
VPT contains a wide selection of sources, and the first eight ones 1video - 8video can be customised to the need of your project, so you could for instance have 8 video sources or 8 still image sources. Other sources are live camera input, a solid color as well as a type of source that makes it possible to receive video stream from other applications. On mac this is based on syphon, on windows it is based on spout.
The 1-8 video sources
The source types available for the 1-8video sources are the video module, the hap module, the still image module and the mix module. The video module is the one you probably will use the most, the hap module is optimised for videos encoded using the HAP codec (although the standard video module does a pretty good job at playing back HAP videoes as well), the still image module is the best choice if you only work with still images. The mix module let´s you mix two sources using various blend modes.

The video module
The video module refers to a folder of videos (or a mix of videos and stills). By default this is the video folder inside the project folder.
To use the source you need to turn it on by clicking on the on/off button and then select a source from the menu (which refers to the content of the video folder).

Unlike previous version of VPT, VPT 8 is not based on quicktime. It uses a video engine based on FFmpeg that supports a lot of different codecs including H264, HAP and prores. For a full list of supported codecs go to https://ffmpeg.org/ffmpeg-codecs.html#toc-Video-Encoders
Depending on your computer, playing several large video files at the same time might slow down everything, so either render your videos at a reasonable size (if you are filling a layer that only covers a quarter of the projected output it doesn´t make sense to use full HD resolution for instance), or use the resolution menu in the quicktime module to let VPT lower the resolution for smoother playback.

Adding your own sources
It´s easy to add your own media files to VPT. One way is to just copy your files to the video folder inside the project folder.
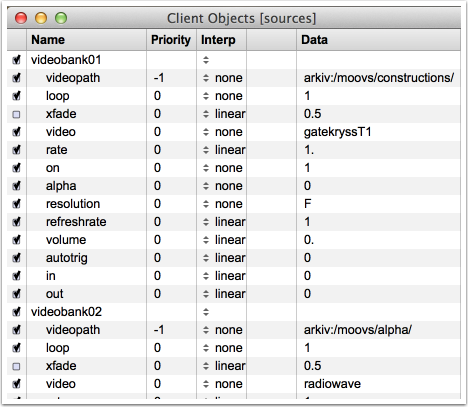
You can also drag folders (not individual files) to the different video containers.

In this case, the first video container, 1video is updated with files from the folder constructions. You can see the foldername associated with a video container in the top right corner of the menu.

You can have different media folders associated with the different video containers.

NB! If you add files to a folder while VPT is open, you need to refresh the video container associated with that folder by clicking on the source number.
still image
The still image module works similarly to the quicktime module.
You can adjust the resolution in a similar way as described for the quicktime module, and you can also adjust the refresh rate (the numbers 1-4).
Unlike a video which is updated maybe 30 times a second, a still image doesn´t get updated by itself, so VPT updates the image at regular intervals based on the the refresh rate chosen.
1 is updated 30 times a second (seldom needed for still images)
2 is updated 10 times a second
3 is updated twice a second
4 is updated every 2 seconds
What you end up choosing really depends on how you will use the still images so you need to experiment, but you will notice a significant toll on framerate if high res images are updated too often.

the mix module
the mix module lets you mix any two sources using different blendmodes. You select your sources from the A and B menus.

The blendmodes can be found in the mix menu, and the mixslider lets you mix source A with source B.

Make your own selection of video modules
In the preferences for VPT, contained in a text file called prefs.txt in the project folder, you can find information about which video source modules (1video-8video) are used.
The last line contains the word sourcebank, followed by some capital letters inside quotes.
In a text editor you can easily modify this line according to your need: Each of these letters refer to the module type:
V video
S still image
H hap
M mix
So for instance if you want 4 video sources and 4 still image sources you would change the line to
sourcebank "V V V V S S S S"
solid
The solid modules creates a white solid (that you can tint when used as a source in a layer), and are probably mainly used as backgrounds or in combination with masks (very useful when creating a mask).
Like the still source, the solid has different refresh rates. It also has a fixed number of resolutions to choose from: XS-S-M-L-XL
XS 4x4 pixels
S 80x60
M 320x240
L 640x480
XL 1024x768
If you only use the solid to fill a layer with color with no mask you can use XS.
If you use it with a mask the mask will look smoother the higher resolution the solid has (try it out to see the difference)
live input
VPT has two live inputs which lets you work with video cameras connected to your computer or any built in cameras. Like the other sources you activate the live source by clicking on the on/off button. Normally VPT autodetects if a camera is connected and opens the connection, and you should see the input in the monitor window (if the monitor is active). If not, click on the settings button and try to find your camera.
You should connect input sources to your computer before you start VPT, else you need to restart VPT.

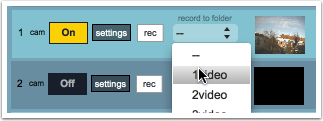
recording live input
You can record the input from the live sources directly into a video folder. So if you select 1video from the "record to folder" menu video files will be recorded to the folder associated with the 1video source.
Click on the rec button to start the recording. It turns red to indicate a recording is taking place. Click on the button again to stop the recording.

VPT autonames the recordings xlive101, xlive102 etc.

Source presets
At the top of the sources section is source-preset control. This hasn´t been mentioned yet, because the default behaviour of VPT is that when you save a preset a source preset is automatically created and you don´t need to worry about this.
However there are several scenarios where it might be useful to keep VPT presets and source presets separate.
A normal situation for VPT is that you create and map your layers for a specific setup, and you don´t really need to move layers around or change their properties. Normally you might be most interested in just creating a fixed setup for the layers and just change the content. So in principle you could then work with only work with one VPT preset with layers and masks etc, and then do the rest with source presets.
A source preset saves information about all the sources, it captures the state of which video is selected in each source, playback speed, looptype, crossfade time etc.
You create a source preset by shift-clicking on one of the circles at the top of the source bank. You select a source preset by clicking on a circle. A yellow circle indicates the current preset, a dark grey circle indicates a preset is stored, a light grey circle indicates an empty preset slot.

Note that VPT by default creates a source preset everytime you save a VPT preset.
You need to change a few settings in the prefs.txt in the projectfolder to work with source presets separate from the normal VPT presets (see more about the preferences in the preferences section of the documentation). The default settings are as follows:
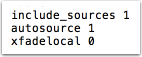
This tells VPT to include sources when saving VPT presets, to automatically create and store a source preset (starting at 1001) when saving a VPT preset, and that crossfades in the cuelist will override any crossfade setting in the individual sources.
You would want to change the settings as shown below, disabling autosaving sourcepresets and enabling use of the local crossfade values.

syphon (mac) and spout (win)
VPT supports the syphon framework for mac and spout for windows, which lets application share videostreams. This makes it possible to use the output from other applications like Processing, OpenFrameworks, Max, VDMX, Modul8 ++ as a source in VPT.

syphon and spout out
VPT can also send its output as a syphon or spout output, so VPT output can be used in other applications.
The syphon/spout out button is located at the bottom of the source list, below the syphon/spout modules.
Syphon output is particularly useful in combination with Syphon Recorder which lets you record the incoming syphon video stream, thus a way to record the output from VPT.

clip control tab
Eventhough the commands here are available through the router or through OSC this gives direct access to more control over the video sources.
First select the video source you want to control (1video-8video)

loop points
set loop points by click and dragging in the slider area. cmd+click-drag (mac) or ctrl+click-drag (win) to move the selected loop (thus the loop length stays the same), shift+click on either side of the current loop selection to increase it.
Loop points are relative, with values between 0. and 1., and these values are saved when a preset is stored.

scrubbing
To scrub through a video you should either stop the video or set the rate to 0.
then just click and drag on the slider to scrub through the frames of the video

playlist
Playlist is an option to have individual playlist for each videosource, playing a clip to the end (or for the still source after specified slide length), then crossfading to the next item in the list.
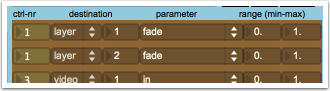
the numbers represent clip nr in the specified source (separated by a space), so the playlist below would play clip 3, fade to clip 5, play clip 5, fade to clip 2, play clip 2, fade to clip 1, play clip 1, fade to clip 3 etc as long as the playlist button is on.
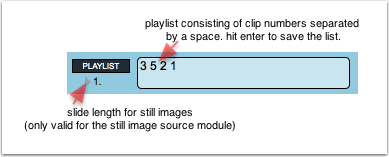
When you click on the playlist button there is a p appearing in the bottom left corner of the corresponding source (you can also activate it directly there).
The crossfade time is the one specified in the source, so in this case 0.5 seconds.
For the playlist to work you have to make sure that no clip is shorter than twice the crossfade time (since a clip fades from one clip and then to another), else the playlist will not move on to the next clip. So if you have a crossfade time of 0.5 seconds for a playlist the minimum length of the clips in the list is 1 second.
You can´t mix videos and stills in a playlist.
You can make a playlist of still images using a still image source, but then you need to specify how long each still image will be shown before fading to the next one. You set the time in seconds by adjusting the number below the playlist button in clip control.
cliptime and loopreport
you can activate cliptime and loop report for a source at the bottom of the clip control tab.
Click on clicktime report to toggle on/off for the particular source. A white circle (1-8) indicates that cliptime report is on.
Click on loop report to toggle on/off for the particular source. The corresponding circle will blink white when a loop is reported.
Cliptime and and loop report can be used to trigger other events via the router.
Also these reports are sent out from VPT using the OSC messages /loopreport and /cliptime making it possible to sync other events external to VPT. Check the OSC section for the right syntax and how to set up OSC for communications outside VPT.

Triggering multiple clips at the same time
There are several approaches to this in VPT 8, either using presets, source presets, or the router combined with a controller or a command from the cue list.
If you want to make sure that clips start from the beginning in a preset you need to click the t (trigger) button for each source
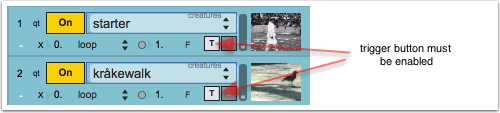
You can then either save normal vpt presets (where sources are included in the preset) or create source presets. Every time the preset is selected the videos will then start at the same time.

The other approach is to set up triggers in the router (then you don´t need to activate the trigger button), just make sure the same controller controls the trigger parameter for each source.

In this case I have chosen controller nr 17 because it is easy to test with the built in buttons in the miditab
Finally, you can trigger the videos from the cuelist using an osc formatted message to the router.
17 is the controller nr, 1 is just an arbitrary number as we only want to trigger an event, not send a value.
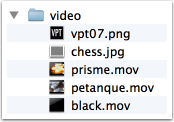
The VPT project folder
When you download and unzip VPT 8 you will get a folder structure like the one below (On Windows it looks slightly different with a few more items).
The folder contains the application file and the default project folder plus some extra files (the readme file, a link to this manual as well as a link to the VPT forum)
Inside the project folder there is a file called projectpath. It is very important that the projectpath file stays inside the projectfolder.
In the introduction section it was described how to open a project.
Another method is using OSC:
/projectpath "HD:/Users/hcg/vpt8/defaultproject-vpt8/" to port 6666. (your full filepath replaces the example path)

The easiest way to make a new project is simply to duplicate the defaultproject folder and give it a new name.
The project folder contains the default video and mask folders, as well as the presets folder, cuelist, preferences and information about how many layers are used.

The layers textfile contains information about how many layers were used the last time VPT was closed. VPT uses this when starting up to create layers.

VPT preferences: prefs.txt
The VPT preferences consists of a list of messages followed by values, and this is where you do some customization of VPT. It is important to not change the messages, only the values.
fsaa 1/0 use hardware accellerated rendering. Default 1
framerate in frames per seconds. Default 30 fps
previewframerate Default 15 fps (to make the general performance of VPT better)
number_of_screens Default 1, maximum 3 when used in combination with a matroxtriplehead2go
screenratio Default 4:3. Accepts anything as long as it follows the number:number format
screendivider 0/1. Default 0. If using more than 1 screen the screen divider can indicate the division between each screen.
preview_width in pixels. Default 320
menubar 1/0 Default 1. Menubar on when starting VPT (see appendix for Mavericks issue with menubar in fullscreen)
cursor_off 0/1 Default 0. Cursor off when starting VPT
preview 1/0 Default 1. Preview window on or off.
fullscreen 0/1 Default 0. Start VPT in fullscreen.
autostart preset/cue/off preset/cuenumber. Start automatically at a preset or cue number.
drawcorners 1/0. Default 1. Show corner handles on active layer.
master 1/0. Default 1 VPT render engine on/off at startup
include_sources 1/0. Default 1. Include sources when storing a VPT preset
autosource 1/0. Default 1. Automatically create a new source preset when storing a VPT preset (numbered from 1001 and up)
xfadelocal 0/1. Default 0. Use crossfade times associated with the individual sources. If set to 0 crossfade times in the cuelist overrides local values
sourcebank list of 8 letters enclosed by quotes. This lets you customize your sourcebank according to the need of your project. V=video, H=hap, S=still, M=mix.

Controlling VPT: Cuelists, the router, midi, OSC, artnet, serial, lfo
VPT has been built to be very flexible in terms of control. In addition to a cuelist there are many options for controlling almost every parameter of VPT in realtime using external midi controllers, built-in LFOs, artnet, serial control and OSC, all connected through the router. VPT can also communicate with other devices and applications using OSC an serial control, as well as an optional DMX module for lighting control.
There are also two optional custom apps for triggering events and parameters in VPT: a live video trigger and a sound trigger app.
More on presets
You can delete a preset by selecting it from the preset list and then click the clear current button

If you click on the + sign next to it you get the option to delete all presets.
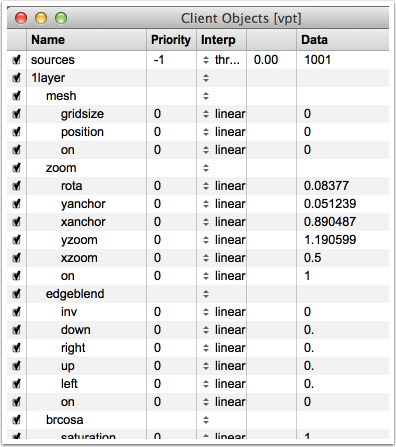
You can find a detalied overview of the current state of the VPT parameters by clicking on the current button. This opens a window with a long list of all the values of the different VPT parameters, which is what gets saved when storing a preset.
Clicking on the store button reveals another window, this time with information about the stored values of the presets you have made.
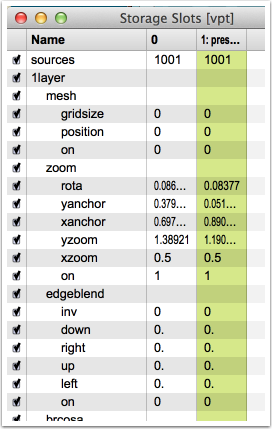
Similarly for the source presets section you will find buttons for clearing the current or all source presets, as well as information about currently active values and stored values.

Cuelist: Creating a cuelist from stored presets
The cuelist allows you to create a sequence of your stored presets. Remember that VPT presets save the state of VPT (meaning all information regarding layers and sources), not rendered video or images. Creating a transition between two presets thus means that VPT interpolates data between these two states (a bit similar to keyframes).
The cuelist is created by creating lines containing information about the type of command, and most often also information about presets involved and a time.
Some of the commands:
F/f : fades(interpolates) from one preset to another in a specified amount of time (in seconds).
F 1 2 3. would fade from preset 1 to 2 in 3 seconds.
C/c: cuts directly to a preset.
C 3 would jump directly to preset 3
If you want to trigger each cue manually this would be the two commands you would use most of the time.
After adding cues to the cuelist you need to switch to play-mode to play them, then click on the cue where you want to start. To stop the cuelist click the stop button (or click on the edit button).
Often you want to automatically go to the next cue after the current cue is finished.
To do this just add a + (separated by a space) after your cue.
example:
F 1 2 3 +
C 3
would first fade from preset 1 to 2 in 3 seconds, then go to the next cue which cuts directly to preset 3.
If you work with cues connected together you might sometimes want t a delay before executing the next cue:
D/d: create a delay specified in seconds before jumping to the next cue
D 5 delay 5 seconds
example:
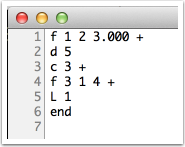
F 1 2 3 +
D 5
C 3
when the first fade is complete VPT waits 5 seconds before executing the cut to preset 3 (notice that the delay line doesn´t have a + after it because it will always jump to the next cue when the delay time is over).
If you want a cuelist that loops continously you can tell VPT to jump to a line in the cuelist
L/l: jump to the line specified
L 1 would jump to the top of the cuelist.

if you want to change or add many cues, it is much easier to use the editor. Click on the open editor button.
here you can add and change your cues as you want, just remember to have "end" at the end of the list
after you close the text editor click on the "update cuelist" (this is not necessary if you close the editor by using the "close editor" button).
You can also create a cuelist in any text editor and open it in the cuelist tab.
More advanced features in the cuelist
S/s: sourcepreset
S 2 would activate source preset 2
You can create a list of source presets instead of using the VPT presets. See the source preset section for how to create them.
Since source presets already contain crossfade information you only need to specify the source preset number.
O/o: send a OSC formatted message to VPT
-variable number of parameters.
+ if you type a plus after the parameters this indicates that the cuelist should continue to the next cue in the list
example
O /layer1/fade 0.50
To set the fadelevel of layer 1 to .5
X/x: send OSC formatted messages out from VPT to another application/computer
the OSC destination needs to be set in the OSCeditor tab.
R/r: Send controller fades to the router, see the router section for how to set up the router.
-Four parameters: control nr startvalue endvalue time
+ if you type a plus after the parameters this indicates that the cuelist should continue to the next cue in the list
example
R 1 0. 1. 5.
would fade controller 1 in 5 seconds from 0. to 1.
if in the router controller 1 is mapped to the fadelevel of layer 1 (with range set to 0. to 1.) you would then control the fadelevel of the layer from a line in the cuelist.
The Router: mapping controllers (midi/lfo etc) to VPT parameters
Almost any parameter in VPT can be controlled. The router lets you set up connections between controllers and parameters.
A controller can be many things. It can be the built in sliders and buttons you find in the midi tab, it can be an external midi controller (which you set up in the midi tab), it could be one of the built-in lfo wave generators in the lfo tab, or it could be a controller set up in the cuelist (using the R command).

controller number
A controller is always referred to by a number. The first column in the router is the controller-nr (ctrl-nr).
By default lines in the router are set to ctrl 1, 2, 3 etc, but the controller number can be set as needed. The important thing to understand is that the controller number specified in the first column in the router must correspond to the controller you are using.
So, for instance in this case both slider 1 in the midi tab and lfo 1 in the lfo tab refers to controller 1, and would then both control whatever parameter controller 1 is mapped to (in this case the rate of 1video).


destination
the second column specifies the destination type, so here you choose if you want to send control data to a layer or video source (or any of the other items in the dropmenu).

The number box just after the dropmenu let´s you specify the destination. So if you have selected video from the dropmenu you need to tell VPT which of the videosources you want to control by changing this number accordingly (1-8). So if it is set to 1 your destination is 1video.
parameter
After setting the destination you need to specify which parameter at this destination from the dropmenu. Since we have selected video as destination type we only get relevant items in the dropmenu. In this case we have chosen rate (speed of video).

range
The final two numbers specify the relation between the incoming controller values and the destination paramater.
Normally most values in VPT are defined as being at the lowest point with a value of 0 and the highest point with a value of 1, so numbers between 0. and 1. represent values between the low and high. So when a layer fade is set to 0 the layer is not visible, at 0.5 it is half-transparent, at 1. it is opaque.
In the case of the rate of a video we might want to expand the range. 0. would mean the video stops, 1. is normal speed. -1 is backwards but at normal speed.
So we could set the low value of the range to be -1 and the high value to be 1.
This would mean that when my controller slider is at the bottom this would be mapped to a value of -1, and when it is at the top it would be mapped to 1.
The range would be used differently if a controller is mapped to cues or presets.
For instance if you want controller 1 to trigger line 3 in the cuellist you would set it up like this:
1 vpt 0 cue 3 3
so the low and high value of the range is set to the number you want to trigger.

one controller controls several parameters
several lines in the router can be controlled by the same controller, so in this case controller 1 would control both the fade level for layer 1 and 2.
if we reverse the range in the second line, the layers would crossfade using one controller, so when layer1 is at full (1.) layer2 is off (0).

midi sliders and buttons
VPT can easily connect to external midi controllers. Select your device from the menu (it´s best to connect your device before you start VPT).
Normally the number to the left of cc will correspond to the controller number (you will see values in the range 0-127 in the number next to value).
VPT also has some built in sliders and buttons which you can use together with the router.

lfo: use waveforms to control parameters in VPT
LFO or Low Frequency Oscillators are basically waveforms that let you automate parameters in VPT via the router.


OSC: sending messages to and from VPT
VPT uses a message formatting system called OSC (Open Sound Control) both to send messages internally in VPT but also to send/receive messages with other applicatons and/or other computers. The protocol used is UDP.
OSC is an addressing system that a lot of different applications use, and it is a very tidy way of accessing parameters with a hierarchical message structure.
The first part of of the message is the destination, the second part is the parameter value you want to send. The destination address gets more detailed from left to right.
A simple example: If you want to control the fade level of layer 1 you start with the most general part, the layer, and ending with the most specific part, the parameter you want to control. Each messagelevel is separated with a /.
/1layer the layer you want to access
/fade the parameter you want to access
put together this becomes /1layer/fade
Finally you would need to send a value to the fade parameter so the final OSC message could be:
/1layer/fade 0.5
If you want to access the brightness value of layer 2 you need to go one level deeper:
/2layer/brcosa/brightness 1.2
To set the rate of the first video source to 2. you first need to add /sources, then which source module /1video, then the parameter and it´s value:
/sources/2video/rate 2.
You will notice that the message structure is very similar to how you create control mappings in the router. In fact the router creates OSC messages from the router list.
OSC editor
To be able to send and receive messages between applications you need to set up a receiving port on the receiving end. For VPT this is 6666. If you are sending to/from the same computer you can use the localhost address, which is 127.0.0.1. Else you need to find the ip address of the computer and make sure to be on the same network.
The OSC editor tab lets you set up and monitor OSC message traffic in and out.
VPT has a default address and port it sends OSC messages to which is 127.0.0.1 and port 6667, so if another application on the same computer is listening at port 6667 it will receive OSC messages from VPT, provided the osc send button is on (default off).
Messages that VPT sends out:
/preset i
/cue i
/cuetrig t
/transitiondone t
/loopreport i t sourcenr bang
/cliptime i f sourcenr relative cliptime (0. to 1.)
You can also monitor both the in and outgoing traffic.

Sending OSC messages from inside VPT
Here are a few ways VPT uses OSC:
In the cuelist you can use the O/o command to send osc messages to any parameter in VPT
O /1layer/fade 0.5
The cuelist also allows you to send OSC messages out from VPT using the X/x command where you can basically send any command you like.
Sending OSC messages to VPT from the outside
There are a lot of applications and devices that support OSC, for instance Processing, MaxJitter, PD, OpenFrameworks. You can even send osc messages from an arduino (or any other device that can send data over the serial port, see the serial section for more info).
There are several apps for smartphones and tablets that let you create interfaces on the tablets and configure OSC messages to work with VPT.
There are also dedicated OSC controller apps like Vezér (mac only) and ossia-score (cross platform and open source).
list of OSC commands
A list of available osc commands for VPT 8
each command is described with the command name and what type of message goes with it:
i =integer (-1,0,1,2,3 etc)
f=float (0.1,0.45,2.22 etc)
s=string (prism,black,chess etc)
t=command is a trigger so no additional messages needed
examples of syntax
to set the fade level of layer 3 to .5 (half transparent) the osc message would be:
/3layer/fade .5
to set the rate of 1source to 2. (double normal speed) the osc message would be:
/sources/1video/rate 2.
to enter fullscreen the osc message would be:
/fullscreen 1
to play a random clip in 1source the osc message would be:
/sources/1video/random
to send a value of .3 for controller 1 to the router the osc message would be:
/router/1 .3
sources
/sources
/1video,/2video,/3video,/4video,/5video,/6video,/7video,/8video
video module
/clip s name of video
/clipnr i (relative position in sourcemenu, 0:off, 1:first video, 2:second video etc)
/rate f (1. normal speed, -1 normal speed backwards)
/loop i (0:loop off, 1:loop,2:palindrome(loop backnforth),3:loop once)
/xfade f (0.,1.)
/resolution i (0:full,1:2/3,2:1/2,3:1/3,4:1/4,5:1/8,6:1/16)
/trig t
/on i (0,1)
/vol f (0.,1.)
/pan f (0.,1.)
/loopreport i (0,1)
/last t play last clip in the menu (often used together with recording live source directly to a source folder)
/random t
/scrub f (0.,1.)
/start t
/stop t
/in f (0.,1.) relative in-point
/out f (0.,1.) relative out-point
/loopreset t
/playlist i i i … (list of clipnumber to be used in playlist)
/play i (0,1) activate playlist
/cliptime i (0,1) report cliptime
/alpha i (0,1) use video with alpha channel (default:0)
/com
still module
/clip s
/clipnr i
/xfade f
/resolution i
/refresh i (0:33ms,1:100ms,2:500ms,3:2000ms) how often still image is refreshed
/on i
/playlist i i i i…
/play i
/slide_length f (time in seconds)
mix module
/A i (0:off,1:1video,2:2video etc according to sourcelist in menu)
/B i (0:off,1:1video,2:2video etc according to sourcelist in menu)
/mix f (0.,1.)
/mixtype i (blendmode 0:normal alphablend, the others according to blendmode list in menu)
hap module
/clip s
/clipnr i
/rate f
/loop i
/xfade f
/on i
/trig t
/vol f
/pan f
/loopreport t
/last t
/random t
/scrub f
/start t
/stop t
/in f
/out f
/loopreset t
/playlist i i i i…
/play i
/1cam,/2cam
/on i (0,1)
/rec i (0:off,1:on)
/recdest (0:none, 1-8:1video-8video)
/1solid,/2solid
/on i (0,1)
/resolution i (0:4 3,1:80 60,2:320 240,3:640 480,4:1024 768) pixelsize
/refresh i (0:33ms,1:100ms,2:500ms,3:2000ms) how often solid source is refreshed
/1syphon,/2syphon,/3syphon,/4syphon (mac)
/on i (0,1)
/update t (check for new syphon servers)
/server s servername
/serverlist i (from server list)
/1spout,/2spout,/3spout,/4spout (win)
/on i (0,1)
/update t (check for new syphon servers)
/server s servername
/serverlist i (from server list)
layer
/1layer,/2layer etc /0layer: active layer
/fade f (0.,1.)
/rgb f f f (0.,1.)
/color f f f f (rgba 0.,1.)
/dcolor i i i (rgb 0,255)
/red f (0.,1.)
/green f (0.,1.)
/blue f (0.,1.)
/blendmode i (0:normal, 1:additive, 2:multiply)
/layername s
/layerorder i
/scalex f
/scaley f
/posx f
/posy f
/cornerpin
/upper_left f f (x y 0.,1.)
/lower_left f f (x y 0.,1.)
/upper_right f f (x y 0.,1.)
/lower_right f f (x y 0.,1.)
/com direct messages to jit.gl.cornerpin
/source s (1video,2video etc)
/flip
/on i (0,1)
/fliptype i (0: normal,1:hor flip,2:ver flip,3:hor+ver flip)
/tile
/on i (0,1)
/xtile i (0,14 0:normal, 1: 1/2, 2: 2/2, 3: 1/3,……14: 5/5)
/ytile i (0,14 0:normal, 1: 1/2, 2: 2/2, 3: 1/3,……14: 5/5)
/zoom
/on i (0,1)
/xzoom f
/yzoom f
/xanchor f
/yanchor f
/rota f
/blur
/on i (0,1)
/blur f
/mblur
/on i (0,1)
/mblur f
/brcosa
/on i (0,1)
/brightness f
/contrast f
/saturation f
/mask
/on i (0,1)
/source s (maskname)
/inv i (0,1)
/blur_on i (0,1)
/blur f
/switch i (0,1)
/moving i (0,1) use moving mask (requires a quicktime video in mask folder)
/points list (f,f,f,f…f,f) list ifof x y points of mask
/edgeblend
/on i (0,1)
/left f (0.,1.)
/down f (0.,1.)
/right f (0.,1.)
/up f (0.,1.)
/inv i (0,1)
/mesh
/on i (0,1)
/gridsize i
/position (f,f,f,f…f,f) list ifof x y points of mesh
/trig
presets
/preset i go to specified preset
/presetprev t
/presetnext t
/store0 store current state of VPT to temporary preset 0
cues
/cue i go to specified cue
/cuenext t
/cueprev t
/cueplay i (0:edit,1:play)
sourcepresets
/sourcepreset i go to specified source preset
/sourcenext t
/sourceprev t
router
/router
/1(/2,/3 etc) f let´s you send controller data to the router
/router-preset i switch between the stored router presets
lfo
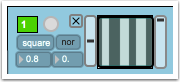
/1lfo /2lfo /3lfo /4lfo /5lfo /6lfo /7lfo /8lfo /9lfo /10lfo
/speed f 1. is normal speed
/phase f
/val f
/range f
/lfomix f (0.,1.)
/on i (0,1)
/wave (0:sine,1:ramp,2:triangle,3:square)
/waveinv i (0,1)
serial communication
/serial
/s1(/s2,/s3,/s4,/s5,/s6,/s7,/s8,/s9) f/i/s sends formatted messages out the serial port /s1 .5 appears as 1 .5
osc out (default destination 127.0.0.1 port 6667)
these messages are sent out from VPT using OSC, if osc out is enabled in the osc-editor tab.
loopreport and cliptime report needs to be turned on for the corresponding sources
(which you can do in the clip control tab or using /sources/1video/loopreport 1 /sources/1video/cliptime 1).
/preset i
/cue i
/cuetrig t
/transitiondone t
/loopreport i t sourcenr bang
/cliptime i f sourcenr relative cliptime (0. to 1.)
div
/onoff i (0,1) turn VPT engine on/off
/fullscreen i (0,1)
/focus i (make layer i the active layer)
/copy t copy from current active layer
/paste t paste to current active layer
/cornerselect i (1 UL,2 UR, 3 LL, 4 LR)
/corner_xy f f (xy position of active corner 0. to 1.)
/drawcorners i (0,1)
/mastercorner
/enable i (0,1)
/draw i (0,1)
/reset t
/blackout i (0,1) makes output window black while you can continue to work on preview window
/masterfade f (0.,1.) a masterfader for all layers
/framerate i framerate for output (default set to 30 fps in prefs)
/pframerate i framereate for preview window (default set to 15 fps in prefs)
/projectpath "HD:/Users/hcg/vpt8/defaultproject-vpt8/" loads a project based on the projectpath specified
VideoTrigger and Soundtrigger for VPT 7
There are two extra VPT applications that uses osc to send control data to VPT, using a setup very similar to the router.
The VideoTrigger lets you use a camera as trigger for events in VPT, the SoundTrigger lets you control VPT events using sound input. See the appendix for more information.
VPT 8 Video Trigger
The VPT 8 video trigger is a modification of Zach Poff´s video trigger patch (he has made a lot of very powerful software, available for free at his website zachpoff.com). It works the same way as the previous version, with a few under the hood changes.
The Video Trigger lets you create up to 6 zones which can trigger events in VPT.
You can download the program here:
videotrigger mac
videotrigger windows
It works by using background detection, so first you need to memorize an empty background.
Then create zones, by first selecting one of the zones, and then click and drag inside the video window. Turn on/off a zone by clicking on the on/off button.
The lower section of the trigger is the router section, more or less identical with the router in VPT, with a few differences:
The control numbers here refer to the zones (1-6). In the last column you can set how the router should interpret the trigger. The normal behaviour is that you get a 1 when you trigger a zone and a 0 when you exit it. Sometimes you might only want the trigger to work when entering a zone, then you should choose "in".
For instance if you want a zone to trigger a random clip in a videosource you would get a doubletrigger if using toggle mode, so first you would get a randomtrigger when the zone is triggered but also when it is deactivated. So this would be a place to use the "in" setting.
You might want to trigger completely different events from one zone. Then you can have one router line handling the activation of the zone (in) and another line handling the deactivation (out).
If working from a different computer than VPT remember to set the ip address. Port number is always 6666.
NB! You can´t use the same camera source both for Video Trigger and VPT


SoundTrigger_VPT8
Similarly, the Soundtrigger VPT app lets you use sound input to control VPT parameters. Here the controller numbers are the right and left channels of a stereo input.
You can download it here:
soundtrigger vpt8 windows
soundtrigger vpt8 mac
Click on the microphone symbol to turn on the sound, click on the sound settings button to configure your input.
Notice how you can modify each channel using amplification, smooth and threshold.

artnet

clock triggers
use the clock triggers to trigger cues, presets or source presets at specific times.

Serial communication
VPT can communicate with serial devices like the arduino microcontroller. This means that sensors and switches can control VPT behaviour but also that VPT can control led lights, motors, servomotors etc.
In the serial tab you set up the connection to your serial device, arduino will be used in this case.
You set up the device in a similar way as you do with a midi device, by selecting the serial port from the menu. If you connected your device after you started VPT click the refresh button to the left of the menu.

the sensor module

Sensors can often give jumpy outputs. The smooth slider gives you the option of less abrupt changes.
Sensors often don´t respond in the full range of their output so you should adjust the minimium and max range (default is 0 min 1024 max)
sensor input from Arduino to VPT
To send sensor data from an arduino to VPT we need to format the data so VPT understands it. This is done by putting an identifier (A-H) in front of the data.
So a analogSensor datasample in this example would be formatted A 678 (analog sensor data is values from 0 to 1024) and the digitalSensor would be for instance B 1
Sensor input sketch example
int digitalSensor,analogSensor;
void setup()
{
pinMode(7, INPUT); //configure digital pin as input
digitalWrite(7, HIGH);
Serial.begin(57600);
delay(100);
Serial.flush();
delay(1000);
Serial.println(-1,DEC); //send -1 to let VPT serial port is ready
}
void loop()
{
analogSensor = analogRead(5);
digitalSensor= digitalRead(7);
// delay 10ms to let the ADC recover:
delay(10);
Serial.print("A ");
Serial.println(analogSensor, DEC);
Serial.print("B ");
Serial.println(digitalSensor, DEC);
}
Sending serial data from VPT: How to control lights, motors etc from VPT
You can easily control led and motors from VPT using serial out. One way is to do it from the router, where you choose serial and then s1 to s8, and then the output range.
Notice that in this example controller 1 is set to have a range from 0 to 255 and controller 17 is set to 0 to 1.
This is because we want the first controller to control a pwm/dimmable output and the other one is a digital output(on/off)
VPT formats the serial output in a similar way as it receives it: first an id and then the data.
s1 and s2 is translated to 1 and 2 when it comes to the arduino, so the data is formatted like this:
1 127 (dimmed halfway)
2 1 (on)

the sketch on the arduino would look like this

with this setup, we could for instance let a lfo waveform control the dimming of a led.

you can also send serial data out from the cuelist using the O/o command

Controlling a servo motor from VPT
We use the same setup for sending out serial data, but this time the arduino sketch looks a bit differently. It ignores the data byte and only looks at the id
so we would send /s1 1(or any number) to go to servo position 1 and /s2 1 to go to servo position 2.

Example of how to control two servo motors from VPT
#include <Servo.h>
Servo myservo1; // create servo object to control a servo
Servo myservo2;
int id = 0; //the two bytes from the incoming data from VPT
int data;
void setup() {
myservo1.attach(9); // attaches the servo on pin 3 to the servo object
myservo2.attach(10);
Serial.begin(57600); // opens serial port, set baud rate
delay(100);
Serial.flush();
delay(1000);
Serial.println(-1, DEC);
}
void loop() {
while (Serial.available() > 1) { // send data only when a byte is received
id = Serial.read(); // read the incoming byte s1,s2
data = Serial.read();
if (id==1) {
switch (data) {
case 0:
myservo1.write(10);
break;
case 1:
myservo1.write(150);
break;
}
} else if(id==2) {
switch (data) {
case 0:
myservo2.write(10);
break;
case 1:
myservo2.write(150);
break;
}
}
}
}
Sending osc formatted messages from Arduino to VPT
a simple sketch for sending osc messages via the serial port, which means you can easily control a cuelist from an arduino for instance.

Download arduino sketches
you can download all the arduino sketches